
One of the great things about Canva templates is their flexibility. You can take a template designed for one purpose and easily transform it into something completely different, like turning life planner template into a decluttering and organization of your home planner or printable.
I’m going to walk through how to do it below, but this is one reason I love Canva so much. With Canva templates, you can customize pre-designed layouts to suit your specific needs and brand aesthetic.
So how would I go about doing this?
First, decide on your next template/planner topic, then do some research to see what pages are popular. When you’re done with those two steps, you’ll start to design the Canva Template your audience wants.
To change the topic of a Canva template, you first need to select a template that is similar to the type of planner you want to create. Then, you can replace the text and images in the template with content related to your new topic. This sounds simple, but it does take work.
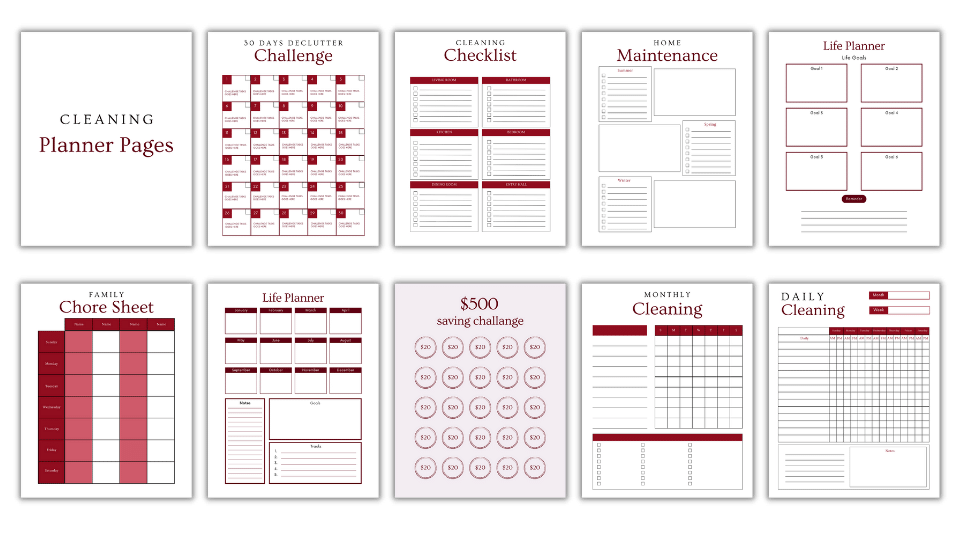
Now I’ll give you an example. Below is the Life Planner out of the Cherry Blossom Canva Template Toolkit that you can purchase from my shop. Also, at the bottom I’m offering 11 Canva Template Toolkits in a bundle for an amazing price. So make sure to check that out.
Let’s beginning.
Examples of How to Change a Life Planner Into a Decluttering Planner
I decided to change the Life Planner because it offers page designs that I could easily visualize that I could customize the layouts into the new topic, plus decluttering and organizing is very popular and people really need to do it in bite size pieces – especially if they have years of work accumulated.
If you take a look at the designs below I’ve picked a few to walk through what I did on each page. I didn’t walk through it, but I’d probably also change the $500 Challenge into boxes done. This would be fun. Right now I’m working with my son to clean our 2nd bedroom out that has turned into a storage area instead of a bedroom. I don’t want to do it all at once, so we’ve been working on completing boxes. Each box has to have a purpose and a way for us to either store it effeciently or get it out of our house. You could change the words and images around to reflect the challenge. 🙂
For this example I’ve picked the monthly cleaning, life planner, daily cleaning, and a decluttering challenge designs.
In these desings, I’m going to have some fun and let my creativity go. I want you to do the same thing. I will describe and show you the ends results of what I did, but I want you to start thinking about what you would do differently. Even if you followed my example and created a decluttering planner – yours would be different.
So, think about these things as you’re reading the post:
- How would yours be different than mine?
- Would you change the images?
- Would you change the colors?
- How about the image location? Do you think it would look better in a different spot?
Now that I’ve given you a few questions to think about let’s get started changing the Canva Template from a Life Planner to a Decluttering Planner.
Adding Images and Icons to Canva Templates for Personalization
I’m the type of person that I like something to do each day so that I don’t get overwhelmed – so I would leave the 30-Day Declutter Challenge page in the same layout. You would either need to add the challenge task for each day or another fun way would be to find icons or images that represented the task.
Even though I’d leave the challenge, I’d change the colors to reflect my brand like I did below or the color palette that I picked for the planner if I didn’t want to use mine.
I added fun images. I really love the woman at the top pushing her closet closed and get identify with her. 🙂 My closets aren’t that bad, but I’d hate for you to see my spare room. Another image that I really liked and wanted to include was a neatly folded pile of shirts, so I added it to the background, and changed the transparency so you can barely see it.
The last modification that I made was the color o the text.
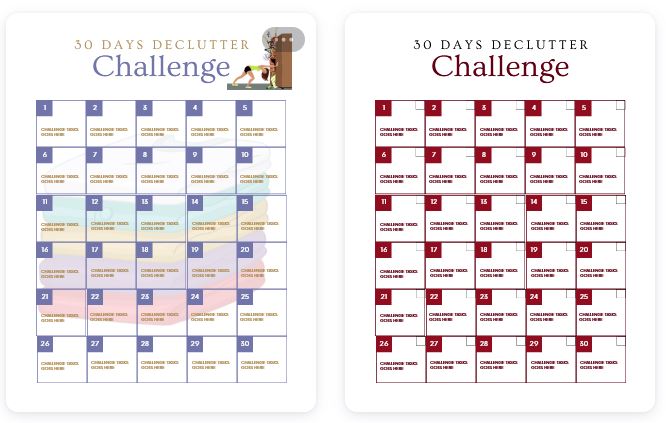
What a difference a few changes can make!
Changing Text Colors to Elevate Your Canva Template Design
Now on to our next Canva Template Customization. I decided to use the Cleaning Checklist.
For this, I changed the header words from Cleaning to Decluttering, changed the colors to reflect my branding, add images, and then took out lines.
Then for each section by the checkmarks, I’d add:
- Keep
- Give Away
- Keep
- Store
- Throw Away
- Goodwill or Charity
Like this:
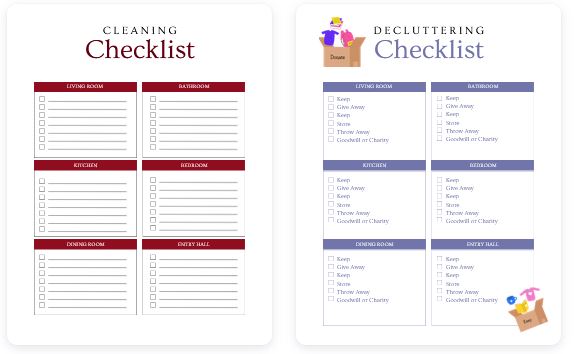
This didn’t take long. It isn’t about taking a ton of time – it is about little changes that are going to make a huge difference and make your digital product different then someone else’s because you’re purchasing resell Canva Templates that you can then sell as templates in your business.
Customizing Tables in Canva Templates for Improved Functionality
Another way to customize your Canva Templates is to completely change the look of the tables that are inside the designs.
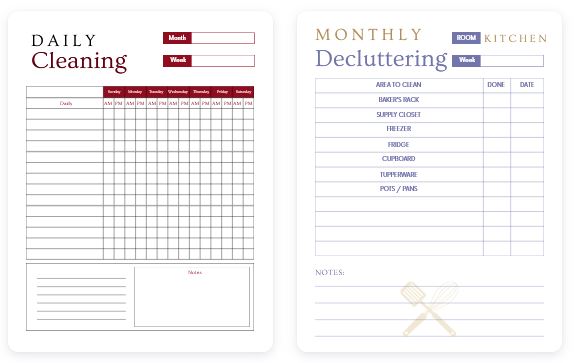
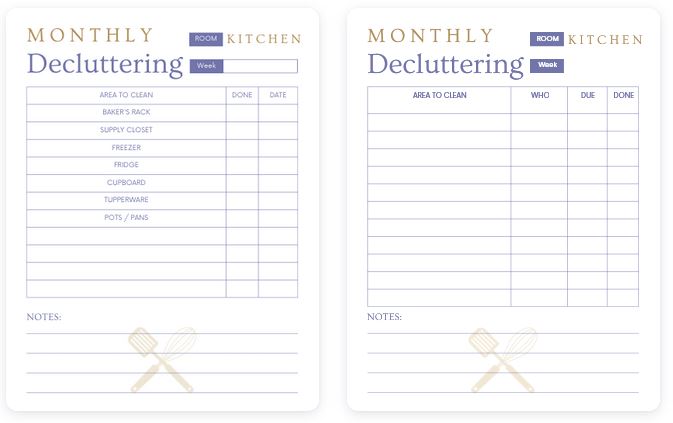
For the Daily Cleaning page I changed the wording to Monthly Decluttering as well as the colors. Then add a few items for each room and provide one for each month that focuses on a section of the house.
After that, I took out all the content that I didn’t need and added my own. I wanted the task, a space for me to put an X when it is complete, and the date it was done.
I also took out elements I didn’t want, made the lines spaced farther apart, and then included an image.
Two More Tips To Make The Planner Better
If you’re a parent you could also add an Assign row at the top – that way you know who is responsible for the decluttering task. If I was doing this with my son, that is what I’d do. I might also add a Due Date and then add the Done at the end instead of before the Date column.
For this particular example, I only created one for the kitchen, but if I was designing a planner I would make a page for each room in the house, as well as the garage. Then I’d duplicate each and add tasks for one and delete the tasks so that the person who purchased the planner would be able to add their own decluttering tasks.
Here is what that could look like:
Change Element Size & Delete What Doesn’t Work When You Customize Canva Templates
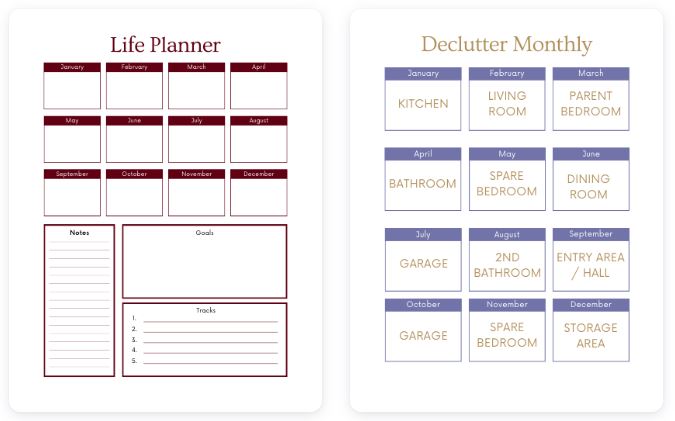
The next one is pretty easy. I would take the Life Planner page and create a monthly calendar with the name of the area to declutter. It is simple, but powerful when someone is working through their house… especially if it needs a lot of attention. 🙂
Do some research to see how many rooms and what they’re called for in most houses. If I was going to do this here is what I’d include:
- Kitchen
- Living Room
- Bedroom
- Bathroom
- Garage
- Entry Hall
- Pantry
- Storage Area
For each of these rooms you’ll want to assign a month to it as I did below:
5 Ways To Customize Canva Templates & Steps To Get It Done
Now that you have a few ideas of how you could change some of these pages into a completely new Canva Planner. Let’s look at the overall look and feel of the templates and ways you can customize yours.
- Change the colors to reflect the new color palette.
- Add cleaning icons, images, or elements on the pages.
- Change around the elements.
- Customize the tables inside to fit your needs.
- Make the elements bigger.
Here are the steps to change the topic of a Canva template:
- Open the Canva template that you want to customize.
- Click on the text you want to change and delete the existing text.
- Type in your new text, such as the name of your new planner or the new topic you want to focus on.
- If the template includes images, you can replace them with images that match your new topic. Click on the image you want to change and select a new image from Canva’s image library or upload your own.
Once you have made all of the necessary changes, review your new design to ensure that it is cohesive and on-brand with your new topic.
Remember, it’s important that your new design still looks visually appealing and professional. You don’t want to simply replace the text and images without considering the overall design and layout of the template.
In Conclusion
In this article, I showed you a few ways to customize Canva templates to create a different themed template all by modifying existing templates. As you can see, you can create Canva Templates unique to your brand and vision by using templates with a Resell License.
The templates we used as examples include a 30-Day Declutter Challenge, Cleaning Checklist, Daily Cleaning page, and Life Planner page. Each of these templates was adapted by changing the colors, adding or removing images, and modifying the content to work with the topic I was designing.
By taking advantage of the Resell Templates at Your Essential Toolbox and Canva’s easy-to-use platform, you can save time, effort, and money while creating beautiful Canva templates and digital products your customers will love. And by customizing these templates, you can create a finished product that is uniquely yours, with all the features you need to meet your specific goals.
Have a great and productive day!
~April
P.S. Check out all my Canva Template Toolkits available in my shop.